
The final inspection is your last chance to ensure the property you're about to own is in the condition you agreed upon. It’s more than just a quick look-around; it’s a detailed verification process that protects your significant investment. A seller's promises and the initial viewing can sometimes mask underlying issues that only become apparent when the home is empty and settlement is just days away. This moment is your final opportunity to confirm that all agreed-upon repairs have been completed and that no new problems have arisen since your last visit.
This comprehensive final house inspection checklist is designed to empower you, transforming a potentially stressful task into a structured, confident review. We'll guide you through the most critical areas, from the structural integrity of the foundations to the functionality of every included appliance, ensuring no detail is overlooked. Consider this your definitive guide to methodically assessing the property's exterior, interior, essential systems, and overall condition right before you take possession.
For buyers in regions like Mandurah and across Western Australia, understanding these specifics is crucial. Navigating this final step with precision safeguards your financial future and ensures your new home is exactly what you expect. This checklist provides the actionable insights needed to identify potential deal-breakers or necessary last-minute negotiations, giving you peace of mind. Let's dive into what you need to scrutinise to ensure a smooth and successful settlement, turning the keys with complete confidence in your purchase.
1. Structural Integrity and Foundation: The Bedrock of Your Investment
The foundation and structural frame are the skeleton of a home; everything else is built upon them. A comprehensive check of the home’s structural integrity is the most critical part of any final house inspection checklist. This involves examining the foundation, load-bearing walls, roof framing, and floor joists for any signs of distress that could compromise the building's safety, longevity, and value.
Foundation issues are notoriously expensive to fix, and structural defects can create a domino effect of problems throughout the house. Identifying these concerns before settlement is crucial. It provides you with the power to negotiate repairs, ask for a price reduction, or even walk away from a potentially disastrous investment.
Key Areas for Structural Inspection
During your walkthrough, be methodical in checking for red flags that could indicate underlying problems.
- Foundation and Slabs: Walk the entire perimeter of the property. Look for significant cracks in the concrete slab or masonry foundation walls. Pay close attention to "stair-step" cracks in brickwork, as these often signal foundation movement.
- Walls and Ceilings: Inside, inspect walls and ceilings for large, diagonal cracks, especially around door and window frames. These can be signs of the house settling or shifting.
- Doors and Windows: Open and close interior and exterior doors and windows. If they stick, jam, or don't latch properly, it could be due to the frame being out of square, a common symptom of structural movement.
- Floors: Uneven or sloping floors are a major red flag. Bring a small level or even a marble to test for slopes in various rooms. A slight slope might be normal in an older home, but significant sagging or bounciness warrants a professional opinion.
Why This Inspection Can Save You a Fortune
The financial implications of a structural defect can be immense, often running into the tens of thousands. One buyer of a 1960s home in Mandurah discovered significant foundation settling during their final inspection. This discovery allowed them to negotiate with the seller, resulting in a $35,000 price reduction to cover the cost of underpinning and repairs.
The following chart illustrates the potential cost of foundation issues against the savings that can be negotiated by identifying them early.
This data highlights how pre-purchase diligence directly translates into significant financial protection for the buyer. If your building inspector raises any concerns, it's wise to hire a structural engineer for a more detailed assessment. For significant repairs, getting quotes from qualified professionals is essential; this guide on navigating local trades in Mandurah can be an invaluable resource.
2. Roof Condition and Attic Inspection
The roof is a home’s primary shield against the elements, and its condition is a direct indicator of the property's overall health and maintenance. A thorough inspection of the roof and attic is a non-negotiable part of any final house inspection checklist. This involves evaluating the roof's material, remaining lifespan, and installation quality, while also checking the attic for ventilation, insulation, and signs of water intrusion.
A roof replacement is one of the most expensive maintenance items a homeowner will face, often costing between $10,000 and $30,000. Identifying potential issues before settlement allows you to negotiate for repairs or a price adjustment, protecting you from an immediate and significant expense. Overlooking this step can lead to hidden problems like mould, water damage, and structural decay.

Key Areas for Roof and Attic Inspection
Your inspection should be systematic, covering both the exterior roofing and the interior attic space to get a complete picture.
- Roof Exterior: From the ground (or with binoculars for safety), look for missing, cracked, or curling shingles or tiles. Check for moss or algae growth, which can indicate moisture retention. Pay special attention to flashing around chimneys, vents, and skylights, as these are common points for leaks.
- Attic Space: Inside the attic, turn off your torch and look for any daylight penetrating the roof boards; this signals a hole. Examine the underside of the roof sheathing and the insulation for dark stains, which are tell-tale signs of past or present leaks.
- Ventilation and Insulation: Ensure the attic has proper ventilation (e.g., soffit and ridge vents) to prevent moisture build-up and premature roof ageing. Check the depth and condition of the insulation; inadequate levels can lead to higher energy bills.
- Ceilings: Walk through every room in the house and carefully inspect the ceilings and top corners of walls for any discolouration, water stains, or peeling paint, as these are direct signs of a roof leak making its way into the living space.
Why This Inspection Can Save You a Fortune
The financial leverage gained from a detailed roof inspection is substantial. One Perth buyer’s inspection revealed a 22-year-old roof with only a few years of life remaining. This information allowed them to negotiate an $8,500 reduction in the purchase price to cover a future replacement. In another case, hidden attic mould from a slow, long-term leak required a $15,000 remediation, a cost the buyer avoided by identifying it pre-purchase.
Understanding the potential costs is crucial when evaluating a property. A detailed report gives you a clear understanding of what you are investing in. You can explore the factors that influence the cost of a building inspection in Perth to see how this small upfront investment provides enormous financial protection against costly, hidden roof and attic issues. This diligence ensures your investment is sound from the top down.
3. Electrical System and Safety Compliance
A home’s electrical system is its central nervous system, powering everything from lights and appliances to heating and cooling. A thorough assessment of its condition, capacity, and safety compliance is a non-negotiable part of any final house inspection checklist. Outdated or faulty wiring is not just an inconvenience; it is a significant fire hazard and can lead to expensive, complex repairs.
Identifying electrical issues before settlement is paramount, particularly in older properties. Problems like obsolete wiring or faulty safety devices can be hidden behind walls, but their presence poses a direct risk to your family and your investment. Discovering these faults allows you to negotiate for repairs, a price adjustment, or to re-evaluate the purchase if the risks are too high.
Key Areas for Electrical Inspection
While a licensed electrician should perform a definitive assessment, you can spot several warning signs during your final walkthrough.
- Service Panel (Fuse Box): Locate the main electrical panel. Check for any signs of rust, moisture, or overheating (burn marks). Note the brand; some older panels, like Federal Pacific Electric, are known fire hazards and may need immediate replacement. Verify the panel has adequate capacity for a modern home, with 200 amps being the preferred standard.
- Wiring: Ask about the type of wiring used in the home. The presence of outdated knob-and-tube or solid-core aluminium wiring (common in homes built in the 1960s and 70s) is a major red flag that often necessitates a complete and costly rewire.
- Outlets and Switches: Test a representative number of outlets and light switches in every room. Look for any that are warm to the touch, discoloured, or have loose connections. Count the number of outlets; too few can lead to the unsafe use of extension cords and power boards.
- Safety Switches (RCDs/GFCI): Modern safety standards require safety switches (also known as RCDs or GFCIs) on circuits, especially in wet areas like kitchens, bathrooms, and laundries. Locate these devices on the main panel or on the outlets themselves and use their "test" buttons to ensure they are functional. This is a critical safety feature that protects against electric shock.
Why This Inspection Can Save You a Fortune
The cost of rectifying a major electrical fault can be substantial. For example, a homebuyer inspecting a 1970s property in Halls Head discovered it had solid-core aluminium wiring throughout. This finding allowed them to negotiate a $15,000 price reduction to cover the cost of a complete rewire, a crucial safety upgrade. In another case, the identification of a faulty switchboard led to the seller replacing it for $2,500 before settlement.
These scenarios underscore the financial importance of a detailed electrical check. Unpermitted DIY work, overloaded circuits, and a lack of modern safety features are common issues that can be easily missed but can have severe consequences. Ensuring the home's electrical system is safe, compliant, and capable of handling modern demands protects both your finances and your family's wellbeing.
4. Plumbing System and Water Quality
The plumbing system is the circulatory system of a home, delivering clean water and removing waste. A thorough check of the entire network is a non-negotiable part of any final house inspection checklist. This involves scrutinising everything from water supply lines and drainage systems to the water heater and fixtures, identifying any issues that could lead to catastrophic water damage or costly, invasive repairs.
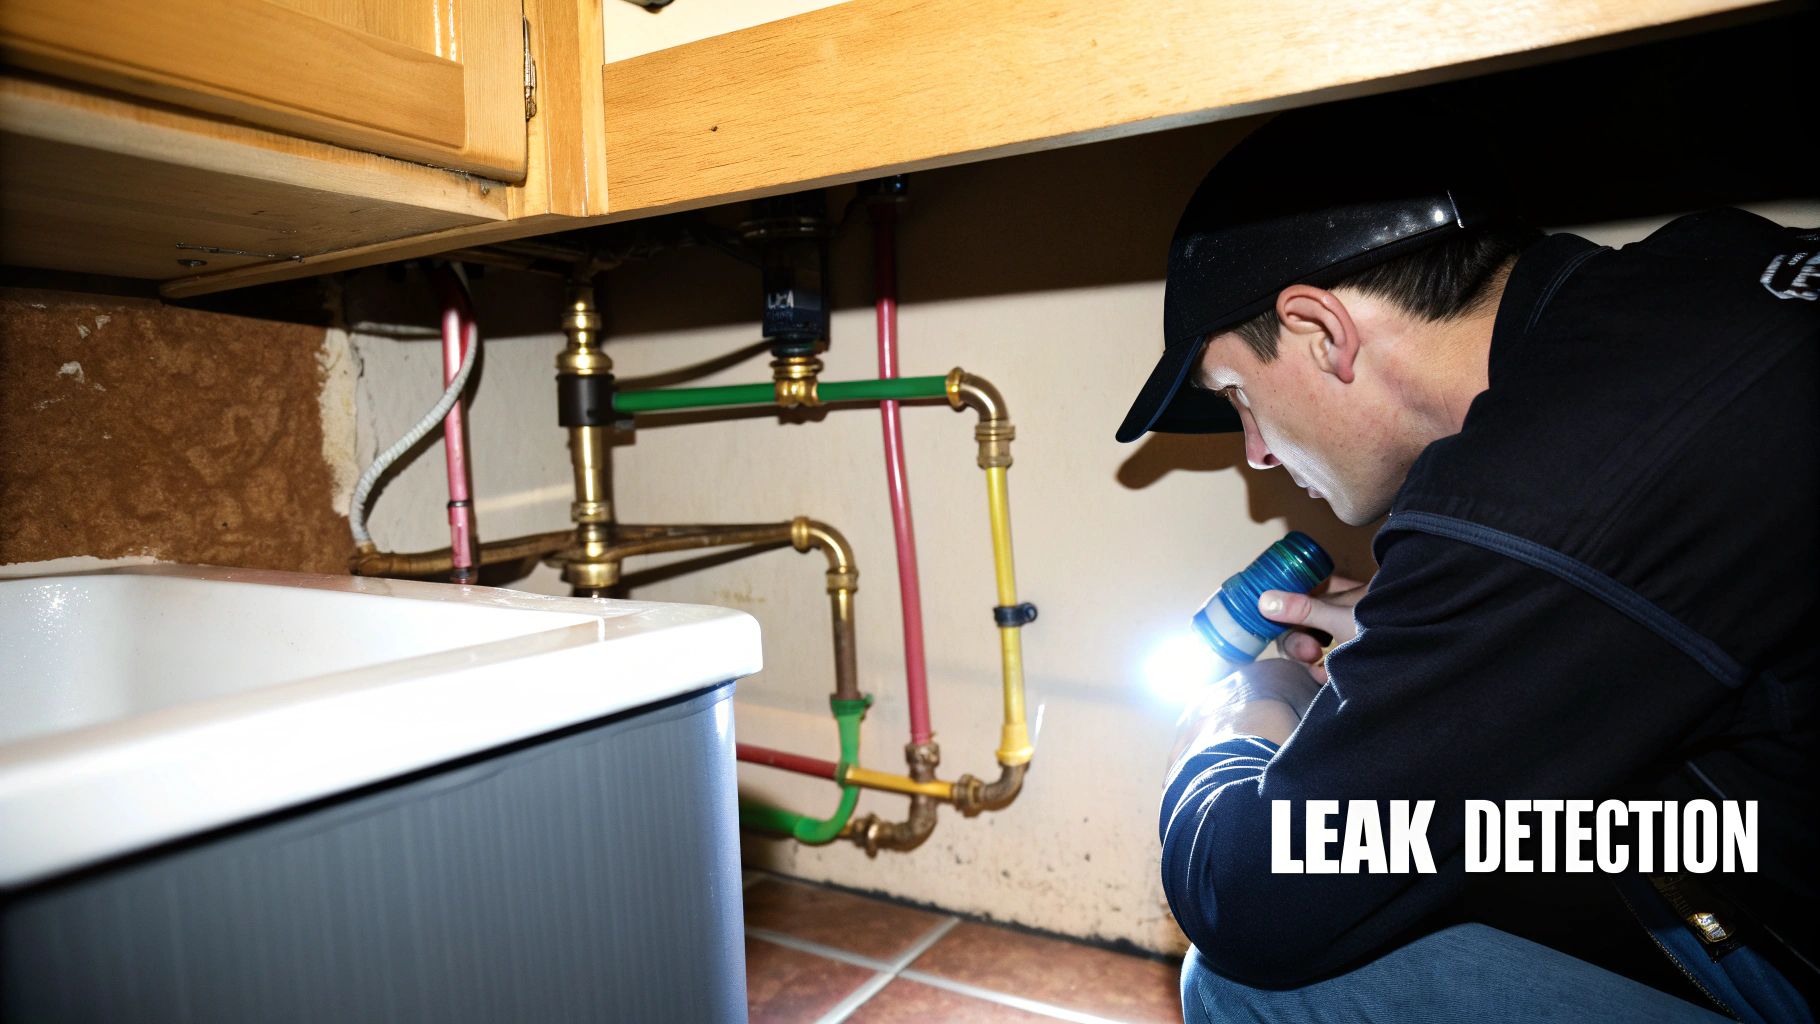
Often hidden behind walls and under floors, plumbing problems can go unnoticed until it's too late. Uncovering leaks, poor water pressure, outdated piping, or drainage blockages before settlement gives you critical leverage. It enables you to negotiate for repairs or a price adjustment, protecting you from inheriting a financial headache disguised as a dream home.
Key Areas for Plumbing Inspection
A systematic approach is essential to ensure no part of the plumbing system is overlooked during your final walkthrough.
- Water Pressure and Flow: Turn on all taps (sinks, showers, baths) and flush all toilets simultaneously. A significant drop in pressure indicates a potential problem with the supply lines or pipe size.
- Drainage: As you run water, observe how quickly each fixture drains. Listen for gurgling sounds from other drains, which can signal a venting issue or a partial blockage in the main sewer line.
- Fixtures and Visible Pipes: Check under every sink and around every toilet base for signs of active leaks, water stains, or previous water damage on cabinetry and flooring. Look for corrosion on visible pipes and fittings.
- Water Heater: Locate the water heater and check its manufacture date on the compliance plate. Most have a lifespan of 8-12 years. Also, verify that a temperature/pressure relief (TPR) valve is correctly installed. Test the hot water at the tap furthest from the unit to check its temperature and recovery time.
Why This Inspection Can Save You a Fortune
The cost to rectify major plumbing failures can be substantial, especially when they require extensive demolition and restoration. For example, discovering outdated and problematic polybutylene piping (common in homes built from the late 1970s to the mid-1990s) during an inspection can prevent a buyer from facing an unexpected $8,000 to $12,000 re-piping job post-purchase.
Similarly, a pre-purchase sewer camera inspection on an older Mandurah property might reveal tree root intrusion in the main line. Identifying this allows for negotiation, potentially saving a new owner from a $30,000 emergency sewer line replacement. These scenarios underscore why a detailed plumbing check is one of the most valuable parts of your due diligence. If any red flags appear, engaging a licensed plumber for a more in-depth investigation is a wise investment.
5. HVAC System Performance and Efficiency
The heating, ventilation, and air conditioning (HVAC) system is the heart of a home’s comfort, controlling temperature and air quality year-round. A thorough evaluation of this system is a non-negotiable part of any final house inspection checklist. It involves assessing the furnace, air conditioner, ductwork, and thermostats to determine their age, condition, functionality, and overall efficiency.
HVAC replacement is one of the most significant expenses a new homeowner can face, with costs often ranging from $5,000 to $15,000. System failures can happen without warning, leaving you with an unexpected and hefty bill. Verifying the system's health before settlement is vital for budgeting, ensuring future comfort, and protecting your family's safety.
Key Areas for HVAC Inspection
A systematic check of the HVAC components can reveal both immediate problems and potential future failures.
- System Age and Condition: Locate the manufacturer's label on both the indoor furnace/air handler and the outdoor condenser unit. Note the manufacture date, as this indicates the system's age. Systems over 15 years old are nearing the end of their typical lifespan. Look for signs of rust, corrosion, or water leaks around the units.
- Functional Test: Regardless of the season, test both the heating and cooling functions. Turn the thermostat to heat and check if warm air is coming from the vents. Then, switch to cool and confirm that cold air is being produced.
- Airflow and Ductwork: Walk through every room and feel the airflow coming from each vent. Weak or non-existent airflow in certain areas could signal crushed, disconnected, or leaking ductwork, a common source of energy loss.
- Unusual Noises and Odours: Listen for loud banging, grinding, or squealing sounds when the system is running. These noises often indicate mechanical problems. Also, be aware of any musty or burning smells, which could point to mould in the ductwork or electrical issues.
Why This Inspection Can Save You a Fortune
Identifying a faulty HVAC system can prevent significant financial and safety risks. During one final inspection, a cracked heat exchanger was discovered in an older gas furnace. This defect, invisible to the untrained eye, was leaking carbon monoxide, posing a serious health hazard. The discovery allowed the buyer to demand a full system replacement before settlement, a saving of over $8,000 and the prevention of a potential tragedy.
In another instance, a buyer identified a 23-year-old furnace well past its life expectancy. Armed with a quote for a replacement, they successfully negotiated a $4,500 credit from the seller at closing. This highlights how a detailed HVAC assessment provides powerful leverage and protects you from inheriting expensive, imminent failures. If you have any doubts, especially with older systems, engaging a qualified HVAC technician for a specialised inspection is a wise investment.
6. Windows, Doors, and Weatherization
Windows and doors are more than just entry points; they are crucial components of a home's security, energy efficiency, and defence against the elements. A thorough check of their condition is a vital part of any final house inspection checklist. This involves assessing their operation, sealing, hardware, and overall integrity to identify issues that could lead to high energy bills, water damage, or security vulnerabilities.
Failing windows and poorly sealed doors can be a significant hidden cost for a new homeowner. Issues like failed seals, wood rot, or improper installation can be expensive to rectify. Identifying these problems before settlement gives you the leverage to negotiate for repairs or a price adjustment, protecting both your comfort and your wallet from day one.
Key Areas for Window and Door Inspection
Your final walkthrough is the perfect time to methodically test every window and door, looking for signs of wear and tear that could become your problem.
- Operational Checks: Open and close every single window and door. They should move smoothly without sticking, jamming, or requiring excessive force. Test all locks, latches, and handles to ensure they engage securely.
- Seal Integrity: Look closely for condensation or fogging between the panes of double-glazed windows. This is a clear sign of a failed seal, which drastically reduces its insulating properties. For all windows and doors, check the weather stripping and caulking around the frames for gaps, cracking, or deterioration.
- Frame Condition: Carefully inspect the frames, especially wooden ones, for soft spots, discolouration, or peeling paint, which can indicate rot. Check for water stains on the walls or floors directly beneath windows, a common sign of leaks.
- Screens and Hardware: Verify that all windows have properly fitting screens without rips or holes. Check that all hardware, including handles, locks, and window winders, is present and functions correctly.
Why This Inspection Can Save You a Fortune
The cost to replace windows and doors can quickly add up, turning what seems like a cosmetic issue into a major expense. For example, one buyer in the Peel region discovered that 15 windows in their prospective home had failed seals. This finding during the final inspection allowed them to negotiate a $7,500 price reduction to cover the replacement costs. Similarly, another inspection uncovered significant wood rot around an exterior door frame due to water intrusion, leading to a seller credit of $3,200 for repairs.
These examples show how a detailed check can prevent you from inheriting expensive problems. Don't underestimate the impact of poor weatherization; it directly affects your utility bills and comfort. If you uncover widespread issues, getting a quote from a local specialist is a smart move. This guide on navigating local trades in Mandurah can help you find a reputable professional for an accurate assessment.
7. Water Damage, Mould, and Moisture Issues
Water is the silent enemy of a home. Unchecked moisture intrusion can lead to catastrophic damage, compromising structural integrity, ruining finishes, and creating serious health hazards from mould growth. A thorough check for any signs of past or present water issues is an indispensable part of your final house inspection checklist, protecting both your health and your financial investment.
Identifying these problems before settlement is critical. The presence of water damage or mould can be a powerful negotiating tool, allowing you to request that the seller performs remediation, provides a credit for repairs, or reduces the sale price. Ignoring these signs can lead to post-settlement discoveries costing tens of thousands of dollars to fix.
Key Areas for Moisture Inspection
Be systematic and use your senses. A musty odour is often the first and most reliable indicator of a hidden moisture problem.
- Ceilings and Walls: Look for discolouration, water stains, peeling or bubbling paint, and changes in wall texture. Pay extra attention to areas under bathrooms, laundries, and rooflines.
- Basements and Crawl Spaces: These areas are prone to moisture. Use a powerful torch to inspect all corners and walls for dampness, dark spots (potential mould), and efflorescence, which is a white, powdery mineral deposit left by evaporating water.
- Around Windows and Doors: Check the seals and frames for any signs of water entry. Look at the wall and floor directly beneath windows for staining or softened materials.
- Under Sinks and Around Fixtures: Inspect the cabinetry under all sinks, around the base of toilets, and near bathtubs and showers for any leaks, water marks, or spongy wood.
- Exterior Grading and Drainage: Walk the property's perimeter. The ground should slope away from the foundation on all sides. Ensure gutters are clear and downpipes discharge water at least two metres away from the house to prevent water from seeping into the foundation.
Why This Inspection Can Save You a Fortune
The cost to remediate mould and repair water damage is often extensive because the problem is usually much larger than what is visible on the surface. For instance, one buyer discovered hidden mould behind basement drywall caused by years of slow seepage. The professional remediation and foundation waterproofing ultimately cost them over $18,000, a cost that could have been negotiated with the seller had it been found during the final walkthrough.
Another common scenario involves bathroom exhaust fans that are incorrectly vented into the attic space instead of outside. This pumps warm, moist air into the attic, creating a perfect breeding ground for mould on the timber framing and insulation, often leading to repair bills exceeding $8,000. For more guidance on what to look for during this critical stage, explore this guide to a smooth final inspection. If you see or smell any evidence of moisture, it is wise to request a specialised mould and moisture inspection before completing the purchase.
8. Appliances, Fixtures, and Included Items
The items included in the sale, from the oven to the window blinds, are a significant part of the value of your purchase. A final house inspection checklist must include a meticulous verification of all appliances, fixtures, and other items specified in your purchase agreement. This isn't just about making sure a refrigerator is present; it’s about confirming that everything you agreed to buy is there, in the expected condition, and fully functional.
Failing to check these items can lead to unexpected expenses and disputes right after you move in. Discovering a non-functional dishwasher or a missing high-end light fixture post-settlement means you bear the cost of repair or replacement. This check ensures the seller upholds their end of the bargain, protecting your investment down to the last detail.
Key Areas for Appliance and Fixture Inspection
Bring a copy of your purchase agreement and methodically work through the list of included chattels. Test everything, leaving no stone unturned.
- Kitchen Appliances: Turn on every hob on the cooktop, and test both the oven and broiler functions. Run the dishwasher on a quick cycle if possible. Check that the refrigerator and freezer are cold, and operate the garbage disposal, listening for strange noises.
- Laundry and Utilities: If the washer and dryer are included, run them through a short cycle. Test the hot water system to ensure it's producing hot water at taps.
- Fixtures and Other Items: Turn on every light fixture and test every ceiling fan on all speeds. Operate the garage door opener, and crucially, test its safety-reverse sensors by placing an object (like a cardboard box) in its path as it closes.
- Included Chattels: Verify that all window treatments (curtains, blinds), remote controls (for fans, air conditioners, garage doors), and any other specific items listed in the contract are present and accounted for.
Why This Inspection Can Save You a Headache
This step prevents day-one disappointment and costly surprises. One Perth buyer’s final inspection revealed the built-in microwave was no longer working. By identifying this before settlement, they successfully negotiated a $400 credit from the seller to cover a replacement, a cost they would have otherwise had to absorb themselves. In another case, a garage door opener was found to be missing its legally required safety sensors, and the seller was required to have them installed before closing, preventing a potential safety hazard for the new family.
Documenting the condition of every item with photos and notes provides crucial evidence if a dispute arises. Always collect any available warranties, manuals, or product documentation left by the seller, as these can be invaluable for future maintenance and repairs.
Final House Inspection: 8-Point Comparison Guide
| Inspection Area | Implementation Complexity 🔄 | Resource Requirements ⚡ | Expected Outcomes 📊 | Ideal Use Cases 💡 | Key Advantages ⭐ |
|---|---|---|---|---|---|
| Structural Integrity and Foundation | High – may need specialist input | Moderate – visual plus possible engineer | Detects critical safety issues early; costly repairs avoided | Homes with older foundations or visible cracks | Prevents catastrophic failure; negotiation leverage |
| Roof Condition and Attic Inspection | Moderate – roof access/weather dependent | Moderate – inspection tools, attic access | Identifies roof lifespan, leaks, energy issues | Properties with older roofs or unknown roof age | Prevents expensive roof replacements; energy savings |
| Electrical System and Safety Compliance | High – partial hidden wiring, code knowledge needed | Moderate to high – testing equipment required | Reveals fire hazards, capacity issues, upgrade needs | Older homes or suspected electrical problems | Avoids fire risk; ensures modern electrical safety |
| Plumbing System and Water Quality | Moderate – hidden pipes limit full scope | Moderate – pressure tests, possible camera | Detects leaks, water quality, drainage problems | Homes with aging or mixed piping materials | Prevents water damage; identifies replacement needs |
| HVAC System Performance and Efficiency | Moderate – seasonal limits on testing | Moderate – requires partial system operation | Evaluates system lifespan, safety, efficiency | Climate control dependent homes | Enhances comfort; predicts costly replacements |
| Windows, Doors, and Weatherization | Low to moderate – mostly visual and functional tests | Low – manual operation and inspection | Identifies air leaks, water intrusion, security | Energy-conscious buyers; older window installations | Improves energy efficiency; prevents interior damage |
| Water Damage, Mold, and Moisture Issues | Moderate – visual and moisture testing | Low to moderate – moisture meters, possible lab tests | Detects hidden damage, health hazards, drainage issues | Any home, especially with water history | Prevents structural damage; health protection |
| Appliances, Fixtures, and Included Items | Low – operational testing | Low – functional tests mostly | Verifies condition and presence of included items | Final walk-through before closing | Ensures belongings match agreement; addresses failures |
Finalising Your Purchase with Confidence
The journey to homeownership is often long and filled with anticipation, and the final walk-through inspection is the last critical checkpoint before you cross the finish line. It's the culmination of months of searching, negotiating, and planning. By now, you've meticulously worked through our comprehensive final house inspection checklist, moving systematically from the structural integrity of the foundation to the functional status of every last appliance. This isn't just a formality; it's your ultimate opportunity for due diligence.
This process transforms you from a hopeful buyer into an informed owner. You've scrutinised the roof for potential leaks, tested every light switch to confirm electrical safety, and run every tap to assess the plumbing system's health. You've opened windows, checked for moisture stains, and ensured the HVAC system responds as it should. Each item ticked off the list represents a layer of certainty, a confirmation that the property you fell in love with is indeed the home you expected. This detailed review empowers you to proceed to settlement with absolute confidence, knowing there are no hidden surprises waiting for you after you receive the keys.
Key Takeaways for a Successful Final Inspection
Your final inspection is your safety net. To make it as effective as possible, remember these crucial takeaways:
- Be Systematic, Not Sentimental: At this stage, emotion can cloud judgment. Adhere strictly to your checklist. Start with the exterior and work your way methodically through each room and system. This structured approach ensures nothing is overlooked in the excitement of the moment.
- Document Everything: Your smartphone is your most powerful tool. Take clear photos and videos of any issues you uncover, no matter how minor they seem. This visual evidence is invaluable if you need to discuss repairs or discrepancies with the seller. A timestamped photo of a leaking tap is far more effective than a vague description.
- Test, Don't Just Look: A visual scan is not enough. Actively test every component. Flush toilets, run the dishwasher through a short cycle, turn on the air conditioning and heating, and check all power points with a phone charger. This hands-on approach is the only way to verify that everything included in the sale contract is in the agreed-upon working condition.
- Reference Your Contract: The final inspection is about verification. Have your sale agreement and any inspection reports on hand. Your primary goal is to confirm that all contractually obligated repairs have been completed to a satisfactory standard and that all included chattels (like appliances, blinds, and light fittings) are present and functional.
Turning Your Inspection into Action
Discovering an issue during the final walk-through doesn't have to be a catastrophe. It's a call to action. Your next steps are clear: communicate immediately and professionally. Contact your real estate agent and conveyancer straight away, providing them with your detailed notes and photographic evidence. They are your advocates, equipped to negotiate a resolution with the seller's representatives before settlement.
Whether you're a first-time buyer in Mandurah or a seasoned investor, navigating this final stage requires a calm and strategic mindset. Remember, the purpose of this meticulous final house inspection checklist is not to find fault but to ensure the significant financial and emotional investment you are making is sound. It safeguards your future and sets the foundation for a happy, stress-free life in your new home. This final, careful step transforms a property from a house on the market into your personal sanctuary.
Navigating the complexities of a final inspection and settlement in the Mandurah property market is much easier with an expert guide. For personalised advice and unparalleled local knowledge, connect with David Beshay Real Estate. Let us help you ensure your property journey concludes with confidence and success. Visit us at David Beshay Real Estate to learn more.

